
You’ve invested in a stunning, statement-making large pot and a beautiful plant to go in it. It looks fantastic for a while, but then you notice things aren’t quite right. The leaves might be yellowing, growth has stalled, or a strange white crust has appeared on the soil.

Don’t worry—you’re not alone. These are common issues in the world of container gardening. The good news is that they’re easily solvable, especially when you start with the generous space of a large or extra-large pot.
At Sigma Planters, we’re not just about supplying premium pots; we’re about helping you create thriving, long-lasting container gardens. Let’s troubleshoot the most common problems.
Problem 1: The Root of the Problem – Circling & Bound Roots

The Signs
- Stunted growth, even during the growing season.
- Water runs straight through the pot without soaking in.
- Roots are visibly circling the soil surface or poking out of the drainage holes.
- The plant becomes top-heavy and may tip over easily.
The Cause
This is a classic case of a root-bound plant. The roots have run out of room to grow and have started circling the inside of the pot, eventually forming a tight, dense mass. This strangles the plant, preventing it from taking up water and nutrients effectively.
The Solution
- The Right Pot from the Start: This is where our large and extra-large pots shine! Giving your plant plenty of room is the best preventative measure. Always choose a pot at least 5-10cm wider and deeper than the plant’s current root ball.
- Gentle Root Pruning: For an already root-bound plant, you’ll need to be proactive. Gently remove the plant from its pot. Using a clean knife or your hands, carefully score the sides of the root ball and tease out the circling roots.
- Repotting: Place the plant in its new, larger home with a layer of fresh, high-quality potting mix at the bottom.
What are Sigma Planters Lightweight Concrete Planters Made From?
While many lightweight concrete planters incorporate materials like perlite, vermiculite, or glass fiber to reduce weight, Sigma Planters has opted for a different approach to achieve the perfect balance of weight, strength, and durability.
Our lightweight concrete planters feature a high-quality fiberglass core with a concrete-look finish. This innovative construction offers several advantages:
- Reduced weight: Fiberglass is significantly lighter than traditional concrete, making our planters easy to handle and move.
- Increased strength: Fiberglass provides exceptional strength and durability, ensuring your planter can withstand various weather conditions and heavy plant loads.
- Flexibility: Fiberglass offers greater flexibility compared to concrete, reducing the risk of cracking or breakage.
- Concrete aesthetic: The concrete-look finish provides the desired appearance without the added weight and maintenance associated with traditional concrete.
We have the capability and tooling for Glass Reinforced Concrete (GRC), but we typically reserve this for custom projects that require additional weight. In most cases, extra weight can be achieved by filling the planter base with gravel or securely bolting the planter to the ground.
By combining the best qualities of fibreglass and concrete, Sigma Planters delivers lightweight planters that are both stylish and functional.
Learn More about Lightweight Concrete Planters
Problem 2: The White Crust – Salt and Mineral Build-Up
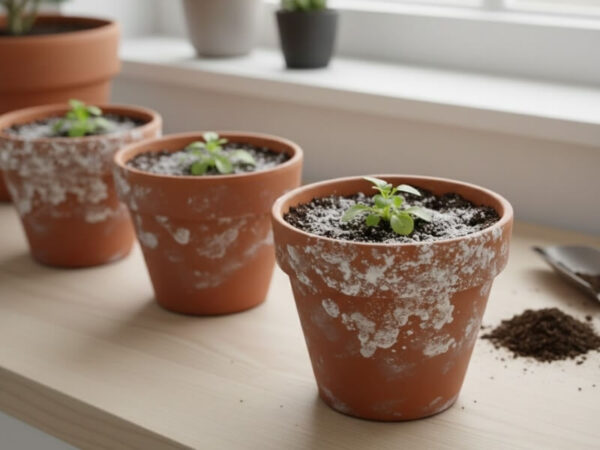
The Signs
- A white, chalky, or sometimes yellowy crust on the soil surface or around the rim of the pot.
- Your plant may show signs of poor health, like brown leaf tips, as the salt build-up can “burn” the roots.
The Cause
That crust is a build-up of soluble salts and minerals, commonly found in tap water and fertilisers. As water evaporates from the soil, these salts are left behind. In our dry Australian climate, this evaporation happens quickly, accelerating the problem.
The Solution
- The Great Flush: Move the pot to a well-drained area and slowly run plenty of water through the soil until it drains freely. Repeat 3–4 times to dissolve and flush out salts. Good drainage is essential.
- Scrape and Replace: Gently scrape off the top 2-3 centimetres of crusty soil and replace it with fresh potting mix.
- Water Wisely: Where possible, use rainwater. If using tap water, occasional deep-watering until it flows freely from the bottom will help prevent future build-up.
Problem 3: Concrete in a Pot – Soil Compaction
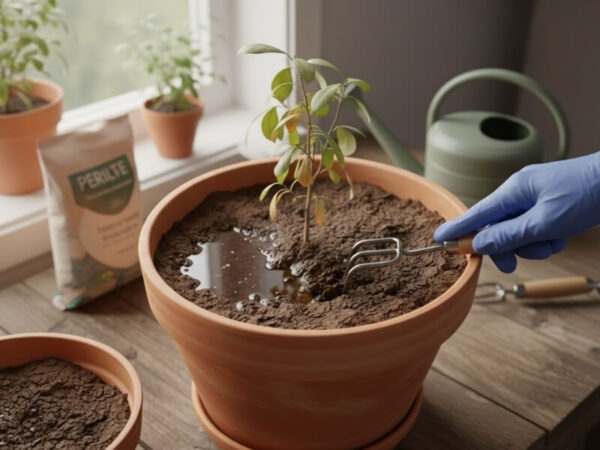
The Signs
- Water pools on the soil surface instead of soaking in.
- The soil feels rock-hard to the touch.
- Plant growth is poor, and the plant may look wilted even after watering.
The Cause
Over time, soil structure breaks down. Watering, gravity, and the absence of soil life cause the mix to become dense and compacted. This chokes the roots, depriving them of essential oxygen and water.
The Solution
- Aerate the Soil: Gently loosen the top layer of soil with a small hand fork or a chopstick. Be careful not to damage large roots. This creates channels for air and water to penetrate.
- Mix in Some Life: When potting up, always use a premium-quality potting mix. For extra protection against compaction, mix in some soil-wetting granules or a handful of perlite or coarse sand to improve aeration and drainage.
- Embrace the Worms: If you have a large enough pot, introducing a couple of compost worms can work wonders. They naturally aerate the soil as they move through it and leave behind nutrient-rich castings.
Problem 4: The Watering Balancing Act – Overwatering vs. Underwatering

The Signs
Overwatering:
- Yellowing leaves that feel soft and mushy.
- A sour smell from the soil or mushy stems.
- Fungus gnats hovering around the pot.
Underwatering:
- Dry, crispy, or curling leaves.
- Soil pulling away from the edges of the pot.
- Water running straight through without being absorbed.
The Cause
Watering is one of the trickiest parts of container gardening. Pots dry out at different rates depending on weather, pot size, and the plant’s needs. It’s easy to assume large pots always need more water, but too much can drown roots as effectively as too little can dehydrate them.
The Solution
- Check the Soil First: Don’t water on a schedule. Press your finger 2–3 cm into the soil. If it feels dry, water thoroughly. If moist, wait.
- Water Deeply, Not Lightly: When you water, do so until it flows from the drainage holes. This encourages deep, strong roots.
- Improve Drainage: Use a premium potting mix and ensure your pot has adequate drainage holes.
- Mulch in Summer: A layer of mulch on the soil surface helps slow evaporation during hot Australian summers.
For larger installations, understanding drainage in large planters can help prevent waterlogging before it becomes a plant health issue.
Your Proactive Defence: Prevent Problems Before They Start
Many common container issues can be prevented from the very beginning. Here’s how to build a resilient foundation for your plants:
- Choose the Right Pot Size: Start with a pot 5–10cm larger than the root ball. Our large and extra-large pots prevent root-binding and support long-term growth.
- Use Premium Potting Mix: Always use a quality mix that meets Australian standards (AS 3743). Avoid garden soil, which compacts easily.
- Ensure Proper Drainage: Good drainage is non-negotiable. Use pots with sufficient drainage holes.
- Water the Smart Way: Check soil moisture daily. Water thoroughly when the top layer is dry, and let the surface dry slightly between waterings.
- Fertilise Carefully: Use slow-release fertiliser to avoid salt build-up and flush the soil occasionally with clean water.
- Repot Regularly: Refresh the soil every 18–24 months to prevent compaction and nutrient depletion.
- Choose the Right Plants: Opt for varieties known to perform well in containers.
The Foundation of Success: Start with a Superior Large Pot
Ultimately, the simplest way to avoid most of these problems is to begin with the right home for your plant. Our range of large and extra-large pots at Sigma Planters provides the foundational space your plants need to thrive for years, not just a single season.
- Ample Root Zone: Prevents plants from becoming root-bound too quickly.
- Greater Soil Volume: Buffers against rapid temperature changes, salt accumulation, and moisture loss—a huge advantage in the Australian climate.
- Stability & Presence: Creates a stunning, permanent feature in your garden, balcony, or courtyard.
Here’s to Greener Days Ahead
With the right knowledge—and the right pots—you can confidently overcome the most common container gardening challenges. A well-designed pot doesn’t just hold soil; it supports aeration, drainage, and healthy root systems.
If you’re looking to give your garden the best possible start, explore the Sigma Planters collection of durable, stylish large pots. Your plants—and your future self—will thank you.
0 Comments